Recent Posts

Wednesday, January 13, 2010

Getting down to work


Yes, as much as I might want to dance around my follower-ness, I have jumped on that "New Year's" resolution bandwagon when it comes to a lot of things in my life. I'm trying not to see these things as resolutions, which to me are normally things I wasn't very good at in years past and want to rededicate myself to.


Instead, I'm seeing the new year as a chance to breathe more life into my life. More passion, more open-mindedness, more craftiness... more, more, more awesome! One of the things I'm kicking my own butt to do (other than the always obvious, exercise) is to get back into screenwriting. I started this blog in October as a baby step in that direction. The goal was to get myself writing and creating on a regular basis. I'm proud to say I'm just a few posts away from 100 total and still adding here! It's giving me the push I need to get back into my original writing passion - writing for the screen.


With that goal for the year in mind, I've decided that my dining table aka work desk solution is just not cutting it. It's time to have a real desk - a place to store my inspirations for my script, my apartment, and my life! I've got a bit of a plan forming but I'm interested in your thoughts. I'm limited by the space of my apartment and the fact that I know I can't put this office space in my bedroom cause I'll never go in there.


Here's the deal and some inspiration from the intra-net... Give me a shout if you've got some great ideas, links, tips, etc. for me as I embark on this quest!


THE SPACE
I'm thinking the only logical place to put the desk would be my entryway (directly across from the kitchen). Any other place in the main room might get in the way of eating/relaxing/playing wii/attempting to do my Jillian Michaels Fitness DVD).


This could work out just fine but my CD Jacket mirror and Suitcase Table may need to live at Gus's for the time being. He is a sweetheart to be cool with babysitting my furniture until I have a bigger apartment or dare I say, house, to put it in.

I'm on the hunt for a desk from anywhere and contemplating customizing a boring piece from Ikea (yay before and afters for the blog!). The space limitations are 42" max wide, 22" max deep and I just have a small mac laptop- not a large, bulky, loves-to-freeze-up PC.


Here are photos of the space -


THE THOUGHTS


 Spotted this on Little Bit Funky yesterday and snagged it for my inspiration file (an open Word Document I keep for all things amazing.) The color is bold but I'm kind of digging it, especially with how everything's been pulled together. Also majorly in love with the two picture ledges. Great stuff and pulled together in a small space.


Grabbed from Houzz.com (a great place to pull together tons of home decorating photos and make your own ideabooks aka inspiration files). I like the use of the beige (any soft color really) contrasted with the white furniture. I have so much dark furniture that I'm thinking it'd be fun to do something different/lighten things up. Also not opposed to some shelving like this, making my office area look more built-in.


Also from Houzz.com, loving the shape of this desk with the x's. Also enjoying the shape of the lamp and the use of the memo board to frame out the space. The backdrop (i.e. the dark brown) is way too dark but still, loving the other details here.


I have always really liked the idea of having a series of clipboards. I'm always thinking about and working on several different projects so I think I'd really enjoy having some cute order to my crafting and writing mania. To boot, I've totally spotted clipboards at the dollar store. Score!


In addition to these photos, I'm also toying with the idea of doing some chalkboard paint and/or incorporating beadboard in some way. I may go to Ikea tonight and surrender 3 hours of my life to perusing the shelves. It's okay- it's all the in name of New Year's and new beginnings...


Chime in with your thoughts, please and thank you!

xo Annie

Tuesday, January 12, 2010

Paper makes it possible


Recently, I've gone on a blog following-rampage of sorts (don't worry, not violent in the least). In my quest to discover all the awesome that's out there in the home decorating, baking, and crafting universe, I discovered Paul Overton's DudeCraft. It's a very entertaining read and includes lots of tutorials, including one for Paper Portraits. I loved what Paul created and decided- yes, this will be a great present for Gus!


The above paper portrait (2nd photo) I created as a tester for the one I did for Gus. I made it for a friend of mine at work who worships Angelina Jolie. The original photo came from a snapshot of her looking at a photograph at the MOMA in LA.


The process for doing paper portraits is fairly simple and straightforward - just make sure you have a great x-acto knife and re-positionable spray mount. I encourage you to check out Paul's blog and tutorial linked here to make your own magic with paper. As you'll see from the one I did for Gus, the cutting can become complex if you use a complex photo - so be careful when choosing your first subject.


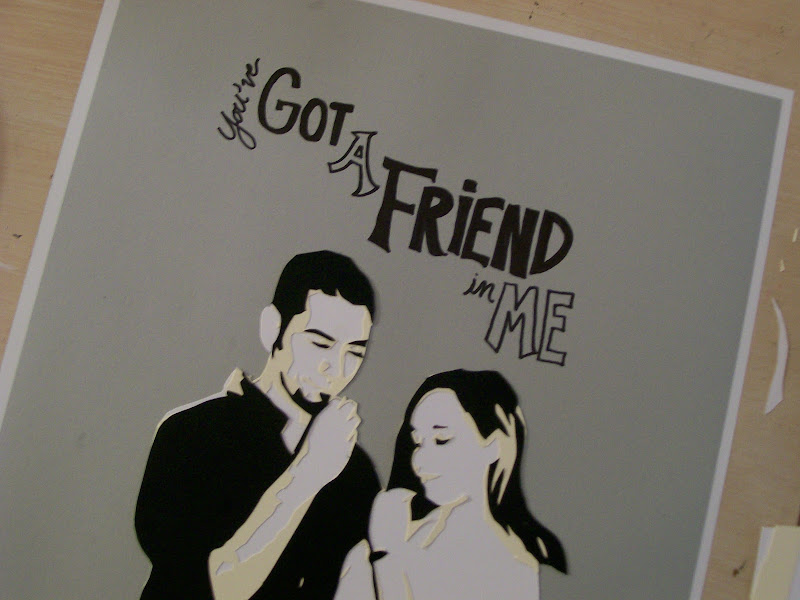
Without further adieu, may I present the actual present for my Gus Gus on his 24th birthday - a salute to our song, "You've Got a Friend in Me."


ORIGINAL PHOTO


POSTERIZED PHOTO (thanks Picnik)


BEAUTIFULLY AWESOME PAPER PORTRAIT 
Framed in a 12" by 12" Record Album Frame


Yay paper portraits!

Linking up to

Monday, January 11, 2010

A-Flix - My Top Movies of 2009


I work in the 'biz and am a bit of a movie buff so I couldn't resist making a great list of 2009. Mainly I'm doing this for my own benefit, but I hope it inspires you to check out some wonderful movies from this year.

ANNIE'S TOP 10 (in order, best first)

Up
Harry Potter and the Halfblood Prince
The Princess and the Frog
The Brothers Bloom
Up in the Air
Avatar
Away We Go
The Proposal
Cloudy with a Chance of Meatballs
Sherlock Holmes

In making this list and perusing EVERYTHING that was released this year, I realized a few things. 

1) There weren't a ton of notable movies, for example, I never thought I'd put The Proposal  on my list but really, it was a lot better than most of what was released this year. 
2) There are still several films that have major buzz that I've yet to see and are therefore not included above: Invictus, Precious, and The Hurt Locker just to name a few. 
3) I think it's kind of funny that I thought Sherlock looked terrible but ended up seeing it AND liking it enough that I added it.
4) Avatar is only on the list because it was too important to filmmaking visually not to include it.

5) Probably the most important lesson of all, while Princess and the Frog is a Disney classic in my eyes and particularly special since I was working for Disney when it was released- Up is most definitely the best movie made in 2009. Not just animated movie, but movie overall. One of the most heartfelt, genuinely funny, and captivating movies ever - Up has convinced me that Director Pete Docter is truly onto something brilliant and I can't wait to see what he does next.


So how bout you? What made your list this year?


Friday, January 8, 2010

A Wall of Awesome - the big reveal


Back in college, my roommate and I started a "Wall of Awesome." Basically, this was a huge white wall that we had no idea how to decorate so we solved that problem by inviting our dorm to submit "awesome." There were some simple rules for our wall: we decided what was awesome AND nothing that was once alive or is currently alive (we got a surprisingly large number of requests to post animals). Anyway, I'll have to show you what "The Wall of Awesome" looked like another time... because today is time for another kind of wall project... the first major undertaking of my life in the new apartment!


THE INSPIRATION

Mostly Sherry and John and their brilliance at Young House Love 
with some noted extra ideas from all the bloggers mentioned in my earlier post, Style through Stripes 


THE PAINT

Valspar Interior Flat Enamel in Churchill Hotel Wheat


THE PAINTERS
 
(Strikingly handsome AND handy with a paint brush. Gosh, I am lucky he loves me. This wall involved a LOT of measuring and taping.)


THE PROCESS


Supplies: 1 Gallon of the paint, one large paint roller, one small paint roller, one paint tray, one small trim brush, one edger (the greatest invention... ever), one large roll 3M painter's tape, a pencil, a yard stick, drop cloth, ladder/chairs, and a laser level (runner-up for the greatest invention ever for painters)


Measuring: Decided how many stripes I wanted - 6. Using Young House Love's formula of dividing the height of the wall by 11 (dividing the height of the wall by double the number of stripes you want minus 1)- we arrived at 9.5 in. We used a yardstick, pencil, and laser level to mark off 9.5 in. intervals all the way down the wall. Then, we used the laser level to shoot a level line across the intervals and run dashes across the length of the wall. These were our guides to place the tape. Definitely needed two people for this- one to hold the level, the other to mark.


Taping: We taped off each line, careful to place the tape above and below the marks we made depending on where our stripes were supposed to go. For example, at the top of the stripe at the bottom of the wall, we placed the tape ABOVE that line, so that we could paint the stripe below. Repeat for hours and smooth the tape as you go. Thank boyfriend for being amazingly awesome. Measuring and taping takes away 3 hours of our lives - hopefully it'll be worth it.


Painting: Fun! We used the edger on the sides of the lines (that meet the other walls) and at the very top and very bottom. An edger is the greatest tool EVER - we didn't even have to tape off the other walls - everything came out clean. For the rest, we used rollers.


Tape Removal: We did this immediately as recommended. Due to the texture of my wall, some of the lines aren't amazingly super crisp but you can only tell up close.


THE BEFORE AND AFTER (Yeah, you're excited, I know it!)


Yay! On to the next project. Have a great weekend everyone and I'd love to hear what you think of the wall!


Thursday, January 7, 2010

Spooning


Ladies and Gentlemen... may I present my Golden Spoon - the first baking award I've ever received! Shiny, right?


To see what won me this metallic prize, check out this earlier post.


Also- check back tomorrow for my home decorating project reveal!

Wednesday, January 6, 2010

Martha Stewart Salmon... Seriously


On one of my recent trips across the country, I indulged in buying an issue of the monthly tome on all things awesome, Martha Stewart Living. I'm sorry folks, I know she's cliche, but she's nonetheless a cliche worth consulting. I don't know how her and her staff keep innovating- but somehow they do!

Over my stay-cation (between Christmas and New Year's), Gus and I attempted to recreate some Martha-awesome with the following recipe for Seared Salmon with Horseradish and Scallions. Our attempt was mucho successful and very decidedly yummy.


You give it a whirl and let us know what you think! Super quick and chic- Seared Salmon with Horseradish and Scallions, courtesy of our lady Martha.


Ingredients:
2 filets of salmon, skin removed (you can use more if you wish, just increase the amts below of other ingredients)
2 green onions/scallions chopped
1 tablespoon of prepared horseradish
2 tablespoons of olive oil
Salt and pepper to taste


Salmon searing in the pan, horseradish side up.

Directions:
PRE-HEAT oven to 375 Degrees. Season both sides of the salmon with salt and pepper. Spread horseradish on the skin removed side of each filet - enough just to cover it evenly.


HEAT oil in an oven-safe skillet at medium-high heat (careful not to let the oil smoke). Add the salmon, horseradish side up, to the skillet and leave for 2 minutes in the hot oil (searing the other side).


Without flipping the salmon filets, TRANSFER skillet to the oven and bake until the salmon is at your desired consistency. Martha suggests 6 minutes, Gus and I did more like 12 because we prefer salmon cooked all the way through.


SERVE warm and topped with scallions. Total time for this recipe is roughly 15-20 minutes including prep. 

Delish! Happy cooking and thanks Martha.


Tuesday, January 5, 2010

Friday Sneak Peek


What have I been up to?! 

Check back Friday for a big reveal of the first major decorating project of 2010.
Related Posts with Thumbnails