Recent Posts

Friday, October 30, 2009

How-to: Make an Up! Costume


This costume takes approximately six hours to complete from start to finish so please leave yourself enough time.


What you'll need:

  • Large piece of Cardboard (I used a White Science Project display board that was $5 at Michael's - highly recommended since it's already white and ready to color on)
  • Wide ribbon like the kind you'd tie up hair with (something substantial with no wiring in it)
  • Duct tape
  • Colored pencils and crayons
  • Scissors
  • Masking tape or clear packing tape
  • 1 Cardboard Toilet Paper Roll
  • 2 Suspender Clips (or binder clips) - see picture right
  • 12-14 Helium Balloons in various colors with long strings
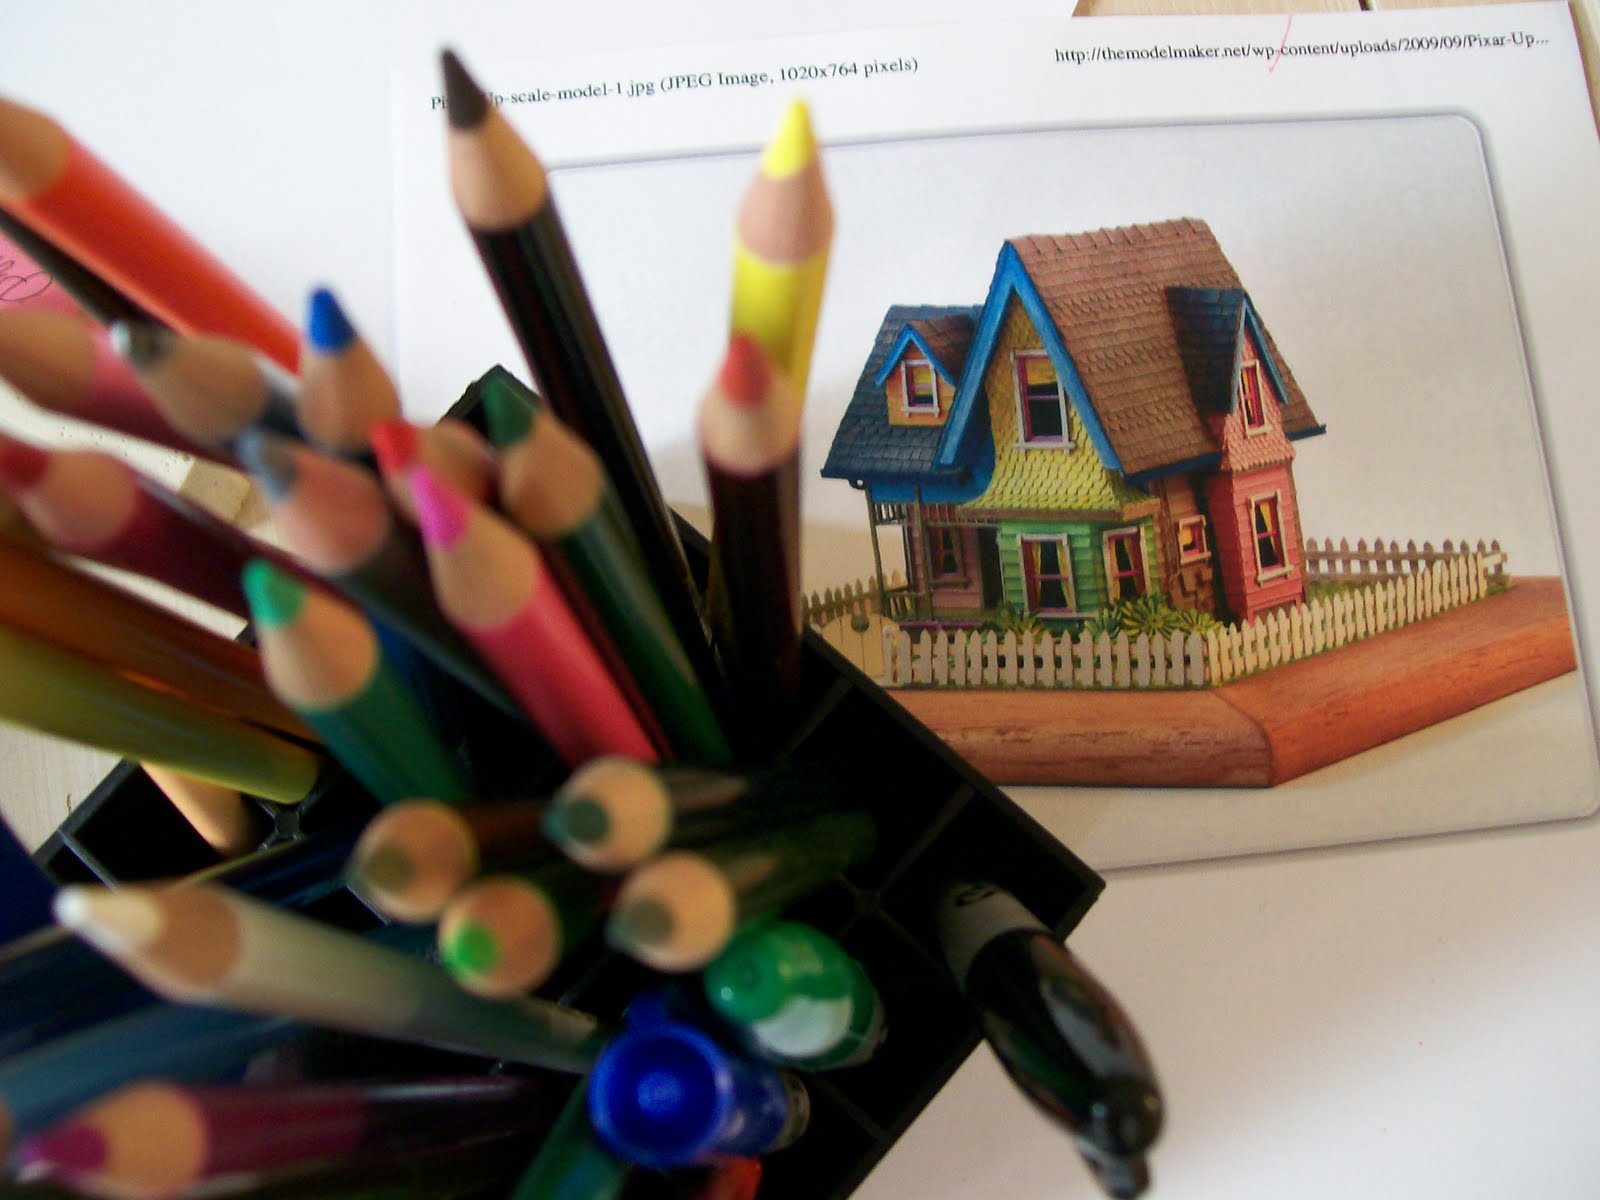
  • Annie's Up House Image/Template and Carbon Paper (Optional)
  • Straight edge (ruler or Ikea catalog... whichever your preference)
Directions:
  1. IF you are going to use this image as a starter for a template, you will take the image and blow it up to your desired actual size. Print then use carbon paper to transfer your design onto the cardboard itself. For more on this process, check out my earlier post on Vector Paintings.
  2. If you'd rather free-hand it, here's how I did it.
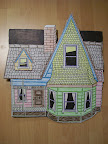
  3. Outline your house with pencil.
  4. Choose the permanent lines you want to use with black sharpie.
  5. Color in all the details.
  6. Cut the design free of the cardboard. (Note: it's important to do this step post-coloring because cutting the cardboard down will make the piece lose a lot of integrity. If you cut it first, then color - pressing on it with the crayons may bend it in places.)
  7. To make the guide for the balloon strings, tape a cardboard toilet paper roll behind the drawing of the chimney using duct tape.
  8. Using duct tape, attach white ribbon to the back of the design, enough so that it comfortably fits over your head and across your chest the way a sandwich board might. Now your costume is ready for the balloon stage!
  9. For the balloons, I recommend getting 12-14 (enough so that it looks good and you have back-up if any break or leak, but not too much so you cant move anywhere). Helium only lasts a good 8 hours total so make sure to get the balloons right before you need to wear your costume. (Note: if you use Mylar balloons instead, they will last for at least a week! However, they don't look like the ones from the movie as much).
  10. This next step is optional but highly recommended. To keep all the strings together (which will soon become important), wrap them in clear packing tape or masking tape all the way down starting at the point you want the strings to emerge from the chimney and going all the way down to the end of the strings (away from the balloons).
  11. Now you're ready to put the whole costume together! 
Final Assembly Instructions (When you're ready to wear it!)
  • Get dressed. I recommend a totally black outfit with black pants that have belt loops through them. 
  • Slide the sandwich board-esque house over your head. 
  • Then take your balloon cluster and feed the bottom of the string rope through the cardboard toilet paper roll.
  • Take the string rope and then feed it through your belt loops until you've got the strings right at the level you want them for emerging from the chimney.
  • When ready, use the first suspender clip to secure the rope to itself to keep it at the level you want it (you could also knot it but that makes it hard to get in and out of the costume).
  • Once secured, use the second suspender clip just to adhere the string rope to your pants themselves.
  • You're finished! Be careful of anything overhead that might catch on the balloons and go find an old man to stand next to. 
Confused? Here are photos to give you and up-close-and-personal reference. Click them to get to a bigger version.


Good luck! Careful walking in this and fair warning: it's pretty tough to bend down so make sure everything you need is counter-height :)

    LwA Featured on Apartment Therapy


    I'm very excited to announce that Living with Annie is being featured today on Apartmenttherapy.com.


    Click here to check it out!

    Up!


    What better way to celebrate one of my favorite animated movies of all time, Pixar's Up, than to immortalize it in my 2009 Halloween costume? Constructed from cardboard, balloons, ribbon, tape, and some dedicated crayon coloring - Carl Fredricksen's Flying house is easily the most fun costume I've ever put together.

     I'll be posting a tutorial shortly complete with flat images of the house (in case you'd like to blow them up and use them as a template). For now, may I suggest for costume success that you add one handsome archeologist date to really make the costume work.


    Happy Halloween everyone!

    Thursday, October 29, 2009

    Ridiculously Awesome Halloween Costumes


    In anticipation of tomorrow's BIG REVEAL of my Halloween Costume, I've compiled a short round-up of some true gems from around the web that are not to be missed. Click any picture for instructional how-to's from the people who actually created them.


    iPod earbuds


    Publisher's Clearing House Winner and Prizegiver (Couples Costume)


    Ahh, tetris. You are awesome.


    OMG, whoever thinks of these things is a genius. Alien Abduction.


    Beaker. I told you this blog involved Muppets!


    Find these and more at an excellent site, www.coolest-homemade-costumes.com. You can also submit your own costume this year to their annual contest!


    And check back here tomorrow...
    I will be posting the reveal of my 2009 Halloween Costume complete with a step-by-step how to and materials in case you want to make it in time for the festivities!

    Wednesday, October 28, 2009

    Hepburn for the Home


    A udrey Hepburn. Actress, Fashionista, Activist, and Icon. She exuded class and elegance like no other figure I could think of. She’s left us a great legacy of classic fashion and beautiful movies like Charade and Breakfast at Tiffany’s.


    Because she’s a personal favorite of mine and her style is one I like to emulate, I thought it’d be fun to take a look at all the home décor that features Audrey. Some of it is charming, some is mass-produced – all of it is pretty sure to add a touch of class if you’re looking to add some to your home or apartment.


    Since you’ve all are probably uber familiar (read: uber tired) of that black and white of her eating “breakfast” at Tiffany’s – I’ve taken the time to round up some of the more unique Audrey art available.


    Ikea is in on the awesome – check out PJÄTTERYD for $79.99, a 35.5” by 35.5” canvas for your home.

    Elloh, aka Ellen Lohse, is an artist on Etsy whose prints are inspired by wonderful movies and television shows. She’s done a whole series inspired by Breakfast at Tiffany’s that you can see below. Each print is extremely reasonable at $35.00 each and they are all signed by the artist. I personally own the kissing in the rain print and it’s fantastic. (Never heard of Etsy? I’ll feature it in an upcoming post.)

    Poking around for this article, I also found another great Etsy artist, Miss Brigette, with a slightly different spin on Ms. Hepburn, just as thrifty for $25.00.

     These next pieces of art are actually premium photographic prints by photographer Allan Grant – premium because of the price tag (starting at $99.99 for an 18x24”) and frankly, the quality of the photo itself. These are both from the 28th Academy Awards and feature Audrey and Grace Kelly interacting in the dressing rooms backstage during the ceremony. Simply gorgeous. (Source, Allposters.com - Click each photo for links to each poster for purchase)


    If you’re not feeling using an Audrey likeness in your home, you could always work in a quote via wall decal. Check out this gorgeous use of a wonderful quote of hers here – 


    And so ends another fun and classy look round the net for excellent home decor.

    Did you know? You Can Make Vinyl Records into Bowls


    About a year and a half ago, I learned the amazing fact that you can make vinyl records into bowls simply by heating them up and shaping them! What a thrifty and unique gift to give someone. I rounded up my friends when we all got together for a wedding and we attempted the craft.


    If you're interested, here is a comprehensive post with photos and video detailing how to turn your records into bowls.


    A big note to keep in mind is to make sure you keep your kitchen extremely well ventilated if you go the route of using the oven. As you melt the vinyl, it releases carcinogens so make sure you breathe as little in as possible.


    Here's another great article with other things you can make out of records besides bowls like coasters and a mail organizer (below). 


    For my two cents, not only do they make great bowls for your keys and other objects, they also make fantastic hats.


    Record bowl image from Wikihow.

    Tuesday, October 27, 2009

    Lauren and Jay's Bathroom Makeover - Apparently, It's Easy Being Green

    Ceramic tile. It can be your most beautiful feature or biggest eyesore depending mostly on the tricky element - color. Loving a bathroom with tile that's any shade of green, let alone mint green, that's definitely a challenge. I would have doubted it could be done - that is, if I hadn't recently seen the gorgeous re-do my cousin Lauren and her husband Jay did on their tile bathroom.

    Located in their fantastically cute home in Brookhaven, PA, first time house-owners (and newlyweds!) Lauren and Jay managed to spruce up this room from blah to glam with just a few additions and a color scheme that worked with the tile and not against it.

    Here's the boring, overly white before -


    And here's the green-with-envy bathroom, post-makeover -


    With the gray paint, new black vanity, replacing the linoleum with tile, a great framed mirror, and a few well-chosen accessories, this bathroom is spa-like and charming. The green tile pulls it all together in the end. 

    I've yet to tackle decorating my own bathroom but I'm now considering using an unlikely color like the green above just cause Lauren and Jay pulled it off so well. Classic, elegant, and awesomely thrifty - I love it!

    Monday, October 26, 2009

    How much is too much for a trash can?


    Natalie Dee Cartoon (Click picture for more)

    I recently ran across this post at AOL's ShelterPop - A Round-up of Trash cans under $100.

    A trash can and $100 in the same sentence? Surely not. Though, to be honest, I'm not as shocked as I would have been a few years ago. Story time, commence.

    A friend and classmate of mine got married our senior year of college and she and her husband treated themselves to an early wedding gift: a stainless steel trashcan. I remember this very well in particular because my friend, upon buying said trash can, came to us - her bridesmaids - proclaiming the price tag - $140.

    $140?! As Seniors, about to embark on a scary adult life of debt and entry-level job scrambling, me and the bridesmaids were in shock! Why... why? $140? For a trash can? I double checked that she was, in fact, putting trash in it and not using it for some higher purpose. We checked in with many other people at school about this hefty trash can purchase - was there something we were missing about the universe and appropriate trash canister pricing? I ran this figure by my dad, the one person I figured might actually say "yeah, duh Annie, that's what they typically cost." His response, complete and utter shock.

    So $140, that was the highest I'd heard of for a trash can. Until today on Casa Sugar where someone is actually posting a discussion thread about the fact that she is thinking of justifying a $300 steel trash can purpose! What is up? I have to know...

    How much will someone actually pay for a bin to put their garbage in..? What is the most expensive trash can available on the market?

    This man needs his trash properly stored.

    Bingo - $1,200 - at least that's what John Thain (above), former and fired Merrill Lynch CEO, paid for his antique wastebasket. According to this article at NY Daily News, apparently he got a bargain on the piece which can go for close to $4,000!! 

    Well, there you go. That's pretty awful. Wait, it gets worse. According to this page, the world's most expensive trash cans go for between $10-15,000.

    Suddenly, $140 doesn't sound too bad. However, us college students weren't about to let that purchase pass. For her mini-bridal shower, we surprised my friend with a super deluxe, bejeweled trash can - complete with butterfly lid (covered in amazing butterfly stickers). It was a bargain compared to the stainless steel one. :)


    Sunday, October 25, 2009

    Copycat Cooking: Olive Garden's Pasta e Fagioli

    I'm a home-cooking convert. To be specific, I used to live for eating out all the time in restaurants. Post-college and now, living on my own, I've begun to see the awesome that is cooking at home. It's cheaper, healthier, and usually way better tasting than anything I get in a restaurant.


    That being said, I still have some favorite dishes that I like to eat out for. Hugo's in Studio City's Mac n Cheese, Cheesecake Factory cheesecake, and Olive Garden (for a guilty-pleasure pasta meal).


    However, I've also discovered a great recipe or two for Copycat Cooking. There are ton of wonderful recipes referred to as "copycat" or "clone" for many of your favorites around the internet.


    Tonight, check out a fantastic recipe for Olive Garden's Pasta e Fagioli that makes a lovely crock pot meal that lasts for days. I personally think it rivals, if not outshines, the Olive Garden's take on it. (And to boot, it's way cheaper than a trip to the place where everyone is family).


    Copycat Pasta e Fagioli
    excerpted from Recipezaar, adjusted by me


    Ingredients
    • 2 lbs ground beef
    • 3 carrots chopped
    • 1 onion, diced
    • 4-5 stalks celery, diced
    • 2 cans diced canned tomatoes
    • 2 cans red kidney beans
    • 2 cans white kidney beans
    • 2 cans of beef stock
    • 3 teaspoons oregano
    • 1 teaspoon of salt
    • 3 teaspoons garlic powders 
    • 2 1/2 teaspoons pepper
    • 5 tablespoons fresh parsley, chopped
    • 1 1/2 teaspoons Tabasco sauce
    • 1 1/2 jars Classico Tomato & Basil Sauce
    • 1 lb of shell noodles (or any other shape you'd like)
    • Fresh parmesan cheese, grated (optional)
     Directions
    •  Cook up all the ground beef
    •  Mix all the ingredients above (except for the noodles) in a large crock pot. Add ground beef, stir, and set to "Low" for at least 5-6 hours.
    • 15 minutes before you're ready to eat, cook 1 lb of shell noodles.
    • To serve, place amount of noodles desired in your soup bowl. Add soup on top of noodles. Top soup/noodles with delicious, freshly grated parmesan!
    • Refrigerate or freeze leftovers (there will be a lot).

    Mangia!

    Halloween Costume Sneak Peek


    Stay tuned for a post this FRIDAY with the big reveal (and a step-by-step how-to!)
    Related Posts with Thumbnails